
Are you looking to add flair to your clay pots? Painting clay pots is a fun DIY project! Learn how to transform plain pots into colourful works of art with acrylic paint and creative techniques. Get ready to unleash your inner artist!
Why Paint Clay Pots?
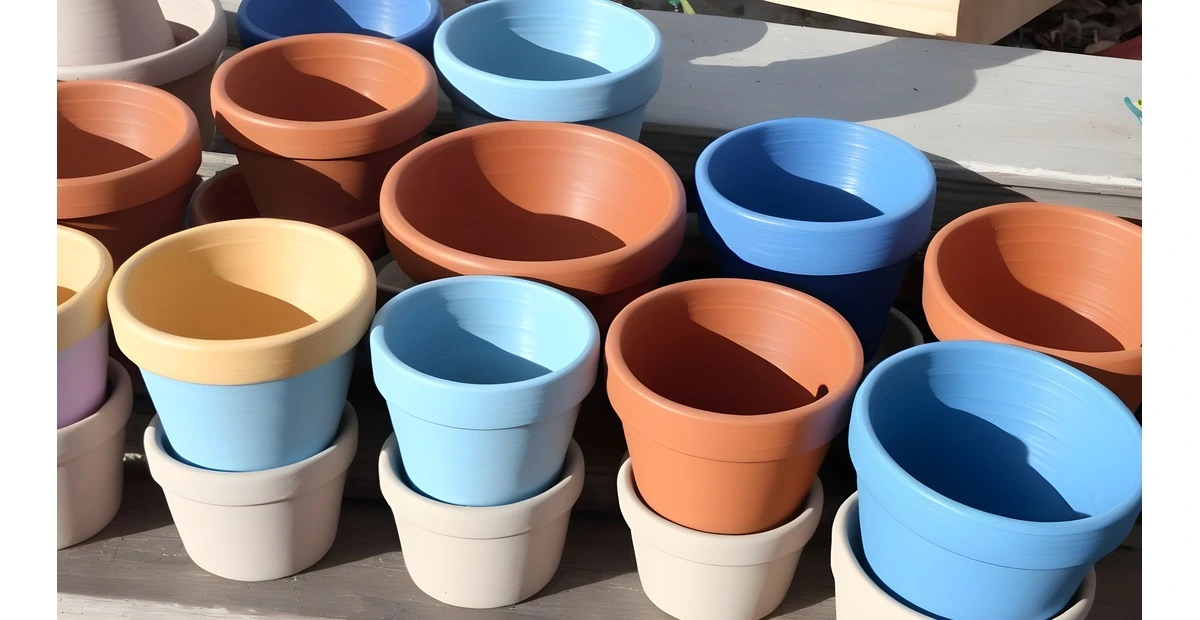
Painting clay pots is an easy way to transform plain terra cotta planters into decorative works of art. When you give your pots a makeover with colour, they become an attractive part of your garden or home decor.

Personalize for any space.
You can choose a color scheme that complements your outdoor space or interior. Warm colors like red, orange and yellow are perfect for a sunny patio. Cool blues and greens create a calming vibe. Or go bright with a rainbow of hues for a fun, eclectic look.
Also, Take a Look: How to Redo Countertops Without Replacing
Protect from weathering
A coat of paint also protects clay pots from damage and wear over time. Exposed terracotta can fade, stain and crack. Paint forms a protective seal, allowing your planters to withstand exposure to sun, rain and temperature changes.
Express your creativity
Get creative with styles, textures or stencils for a one-of-a-kind appearance. You can also distress the paint for a rustic vibe or practice a sealant for a smooth end. The options for customizing are countless!
With some paint and creativity, you will remodel dull clay pots into lovely artwork in no time. Your flowers and your area will thank you.
Preparing Clay Pots for Painting

Before splattering those clay pots with color, you want to do some prep work. First, smooth the pots thoroughly to remove any dirt or particles. A short wash with soap and water must do the trick.
Once accessible, lightly sand the entire floor of the pots. This roughs up the easy clay so the paint has something to grasp. Wipe away dirt with a tack fabric.
Now you are ready for priming. Apply a coat of acrylic gesso or primer and permit it to dry absolutely. Priming seals the clay and gives a neutral base to your paint. It can even prevent the clay from soaking up excessive paint.
When the primer is dry, you could want to cartoon out a design to use as a guide. If loose-handing it, remember the pot’s form and any texture or sample in the clay to inspire your advent. Think swirls, dots, geometric shapes. The alternatives are countless!
You can start painting with your pots quickly, primed and layout-ready. You’re first, unfold some newspaper or a drop cloth to tidy your paintings. Once your masterpiece is complete, seal it with a clear acrylic sealer to guard your newfound artwork.
Painting Techniques for Clay Pots
Painting clay pots is a fun, creative project that allows you to customize plain terra cotta pots to match your home decor. You can use a few techniques to transform boring clay pots into beautiful works of art.
The simplest method is freehand painting. Apply a base coat of acrylic paint, let it dry, and then use a brush to paint freeform shapes, patterns, or images onto the pot. You can also use stencils or lettering to create geometric designs. For curved surfaces, flexible stencils work best.
Sponge painting creates an interesting mottled effect. Dab a damp sponge into the paint and lightly press onto the pot. As you dab, rotate the sponge for varied marks. You can also create gradients by starting with darker shades and then gradually lightening the paint on the sponge.
For a rustic look, try distressing. Apply a base coat, then scratch some of the wet paint away with steel wool or sandpaper once dry. Wipe away loose flecks and seal with a clear topcoat. The exposed clay will show through, giving the pot an aged patina.
Permanently seal your creation with a clear acrylic sealer or topcoat, regardless of your chosen technique. This protects the paint and allows you to use the pot for plants. With the proper technique and a little creativity, you’ll be turning humdruyou’lll pots into colourful works of art in no time!
Inspiring Painted Clay Pots Project Ideas

Geometric Patterns
Get creative with painter’s tape to create patterns on your clay pots. Stripes, zigzags, triangles or hexagons—the options are endless. Apply the tape, then paint over it. Once dry, peel off the tape to reveal your pattern. This eye-catching look pairs well with minimal greenery like succulents.
Ombre Fade
Nothing is more en vogue than an ombre fade. Start with a darker shade at the top of the pot, painting downward using progressively lighter versions of the same colour family. A gradual fade from navy to baby blue or forest green to seafoam would make a stunning statement in any garden.
Stenciled Lettering
Add a thoughtful message to your pots using stencils. Choose stencils with words like “grow”, “bloom”, “gat”, or”.”Po” edition” the s”pencil “in your pot and dab paint over the stencil using a sponge or stencil brush. Carefully peel the stencil away to display your heartfelt message. These also make lovely gifts for fellow gardeners.
Freehand Florals
Channel your inner artist by painting freehand florals on your clay pots. Daisies, tulips, roses or cherry blossoms—pick your favourite bloom. Sketch the basic shape of the petals with a pencil first if needed. Then, dip your brush in the paint and practice your brushstrokes. Imperfections will only add to the charm! Add leaves and a stem for the complete floral effect.
FAQs on Painting Clay Pots
A few common questions arise when embarking on a clay pot painting project.
Do I need to seal the pot first?
Sealing porous clay pots before painting is an excellent idea to provide a smooth base coat to which your paint can adhere. Apply two coats of sealant, waiting for it to dry in between. Water-based sealants like acrylic work well for indoor pots. For outdoor pots, use an outdoor sealant.
What kind of paint should I use?
Acrylic, enamel or chalk paint all work great for painting clay pots. Water-based paints allow the clay to breathe. Oil-based paints can potentially damage the clay over time. Choose a paint specifically meant for outdoor use if placing the pot outside.
How do I finish the pot?
You’ll want to apply sealant to protect your painted clay pot from damage and weathering. For indoor pots, apply 2-3 coats of acrylic sealant. Use an outdoor sealant like polyurethane for outdoor pots and wait for it to dry between coats. The top coat will help prevent the chipping and fading of your paint.
Can I still plant in a painted pot?
Yes, you can still use a painted clay pot for planting. However, the paint and sealant may eventually deteriorate from constant moisture and handling. Re-seal and touch up the paint as needed to maintain protection. For edible plants, check that any sealants used are food-safe. It’s best to avoid paint. It’s the inside pots used for edibles.
With the proper techniques and products, you’ll create colourful you’ll art from your clay pots in no time. Happy painting!
Conclusion

So there you have it – clay pot painting. With just a few basic supplies and creativity, you can turn those old terracotta pots from drab to fab in no time. Whether you are a beginner or an artist, painting clay pots offers a fun and rewarding creative outlet. The techniques we covered give you many options to make your pots pop. Whether you want an Ombre look, pretty patterns, or crisp, solid colours, you now have the know-how to get it done. Painting pots is an easy, fun way to add artistry and personality to your plantings. So grab some pots, paints, and brushes and let your imagination run wild. You’ll be amazed at the You’llus planters you can create. Happy painting!